Welding ABC
How to Avoid the Most Common MIG/MAG Welding Defects
15 February 2021
The quality requirements in welding production increase with the optimization of structures as well as the development of materials and welding processes. Welding defects can, at worst, cause serious accidents and structural damage, so it is important to avoid them and understand the mechanisms that create them. In this text, we present the most common MIG/MAG welding defects and the ways to best avoid them.
Reetta Verho
Welding quality assurance is a holistic job. High-quality welding operations are guaranteed by professional personnel, welding procedure specifications (WPS) and work instructions, and inspection activities. All areas must be in good condition for high-quality welds to emerge.
In the Finnish welding terminology standard SFS 3052, a welding defect is defined as “a discontinuity in the weld or deviation in the form of a weld. Welding defects include cracks, lack of penetration, porosity, and slag inclusion.” Moreover, the international standard ISO 6520-1 classifying and describing weld imperfections states a welding defect being “a discontinuity in the weld or deviation from the assumed geometry of the weld.”
What are the most common MIG/MAG welding defects?
The most common welding defects in MIG/MAG welding include e.g. porosity, inclusions, undercut, excessive asymmetry of fillet welds, lack of penetration, and spatters. Perhaps the most typical ones with the MIG/MAG welding process are spatters and lack of fusion. Each welding defect has its own reasons of origin that the welder must know in order to be able to avoid their creation.
Below are a few examples of typical MIG/MAG welding defects and how to prevent them from happening.
Lack of fusion
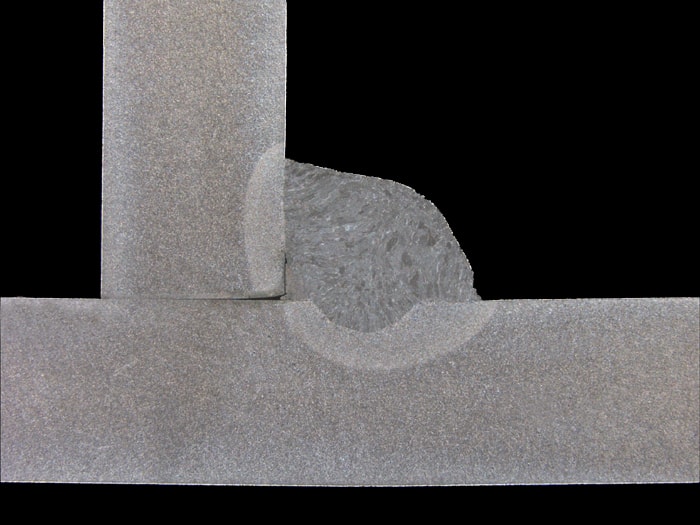
Reasons | Prevention method |
|---|---|
Too narrow joint preparation | Ensure that the joint preparation is sufficiently wide |
Incorrect gun angle | Make sure the gun angle will produce adequate side-wall fusion |
Excessively high current or too low a welding speed, which creates weld pool flooding ahead of the arc, resulting in insufficient penetration | Select welding parameters (high welding current, short arc length, and not too high a welding speed) that promote sufficient penetration without causing flooding |
Impurities on the joint faces | Clean the joint faces |
‘Downhill welding’ | Use vertical up welding |
Too long arc / too high voltage | Use shorter arc / less voltage |
Too low heat input | Increase heat input |
Excessive fillet weld asymmetry
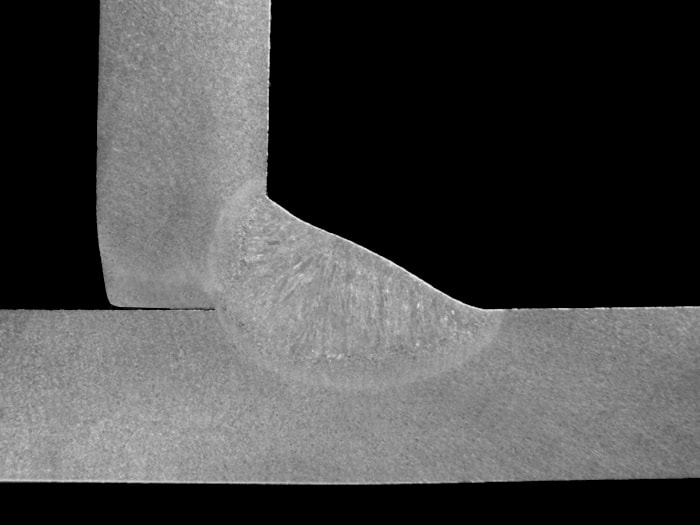
Reasons | Prevention method |
|---|---|
Incorrect gun angle | Use the correct gun angles |
Too large a weld pool | Reduce the deposition rate |
Magnetic arc blow | Move the earth return clamp, use the shortest arc possible, reduce the welding current, angle the gun opposite the direction of arc blow, and/or use an AC power source |
The welding defect limits are specified for each weld class in ISO 5817. In this standard, the limits are classified into three weld classes, namely grade B, C and D. In the mechanical engineering industry, the typical grade is grade C, but grade B is also often required in much more demanding welding production. The welding defects are presented in the standard as actual measurements. The detection and interpretation of these values may require a destructive testing method alongside visual inspection.
Avoid welding defects to improve welding quality
Welding defects should be avoided simply because they require repair. All welding-related repair work in the production floor require time and therefore money. This will slow down production progress, and eventually delays in project schedules. However, the most unpleasant consequence of welding defects can at worst be a product or a structure breaking down, which can lead to various accidents and even personal injury.
We can detect welding defects by inspecting the welds, but at that time it is already late and the product has to be repaired. Welding production must be developed in the right direction in order to reduce the risk of welding defects. Such development measures may include, for example, tightening the quality requirements for groove preparation, changing the welding process, or changing the parameters. However, the training of welders is particularly important. The qualification of welders plays a very central role in quality improvement work.
Visual inspection and production monitoring in a key role
The most important method of welding inspection is visual inspection. Every welder should therefore also act as an inspector of their own work. Good results have been achieved in welding production when visual inspection training has been provided for welders. Often, even with such small measures, the quality of welds can be significantly improved.
Real-time production monitoring also plays a key role in preventing welding defects. Kemppi’s WeldEye software enables easy monitoring of welding production, as it automatically checks, for example, whether the welder is qualified for welding the product in question and that the qualification certificate has not expired. The software can also be used to monitor welding parameters and NDT inspections. At best, real-time monitoring of welding production can prevent welding defects from happening, and make it easier to find the cause of detected defects.

Reetta Verho
Reetta Verho
Manager, Welding Services at Kemppi Oy. International Welding Engineer (IWE) who is an active member in ISO standardization committees. Board member in The Welding Society of Finland. Passionate about welding quality and the development of welding production. Member of: K105 National mirror committee for welding, ISO/TC44/SC10 Quality management in the field of welding ISO/TC44/SC11 Qualification requirements for welding and allied processes personnel.

